Purpose
Plans are often drawn with the dimensions to the outside of the veneer (brick, stucco, etc.). With this feature, walls can be input to the outside of the veneer, which eliminates the need to perform calculations to find the outside of the wall.
This feature also shows the veneer on the model (and may be a requirement for customers in Eastern Canada and the Northeast part of the United States).
Prerequisites
A layout
Steps


To create a new wall with veneer:
- Click Settings to open the Settings window.
- Define wall settings and truss settings, including wall width, elevation, overhang, cantilever, spacing, and plies. See Wall Input for more information.
- Check the Wall Veneer option to enable the following settings:
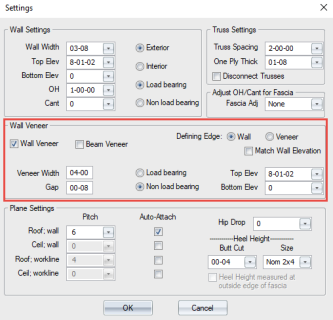
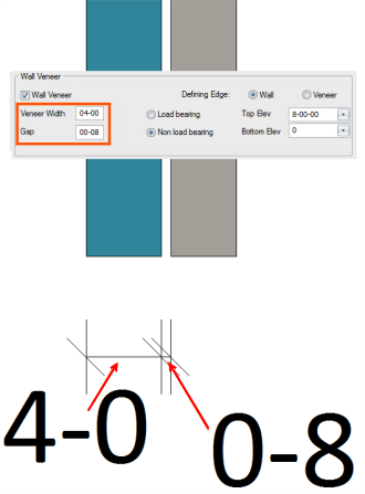
Veneer Width - define the width of the veneer
Gap - define gap distance between the wall and veneer
Load bearing - define whether the veneer is load bearing. A bearing is created on a truss if the veneer is load bearing and the top elevation of the veneer is at the same elevation as the bottom elevation of a truss.
Non Load bearing - define whether the veneer is non load bearing. If non load bearing, an extra bearing is not created on truss that passes over it.
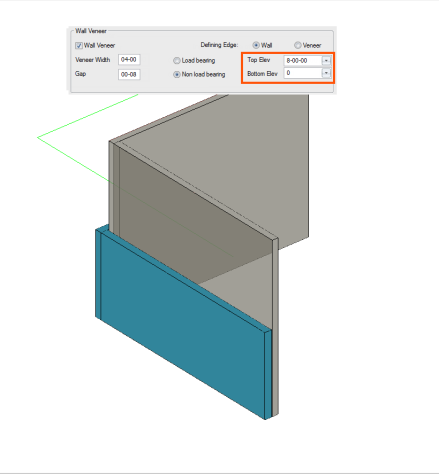
Top Elev - define top elevation of the veneer (does not need to be the same elevation as the top of the wall)
Bottom Elev - define bottom elevation of the veneer (does not need to be the same elevation as the top of the wall)
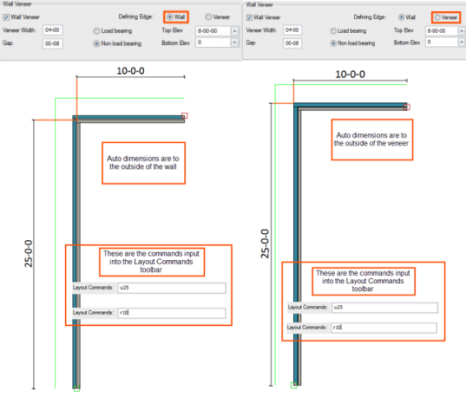
Defining edge (Wall) - When this radio button is selected the distance input into the "Layout Commands" text box defines the length of the wall to the outside of the wall and not to the outside of the veneer. For example if "u25" is input followed by "r10", a vertical 25' wall is created followed by a horizontal 10' wall. The veneer is added to the outside of the wall based on the veneer width and gap that was input. When this option is selected the auto dimensions are to the outside of the wall and not the outside of the veneer.
Defining edge (Veneer) - When this radio button is selected the distance input into the "Layout Commands" text box defines the length of the wall to the outside of the veneer and not to the outside of the wall. For example if "u25" is input followed by "r10", a vertical wall is created followed by a horizontal wall, but the input length is to outside of the veneer and not to outside of the wall. When this option is selected the auto dimensions are to the outside of the veneer and not the outside of the wall.
Match Wall Elevation - When selected, veneer will be created at the same top and bottom elevation as the wall. The veneer can be set at any elevation, so that it hangs below the wall or reaches only partially up the wall (wainscot). The most common case, however, is for the wall veneer to match the wall elevation, both top and bottom, exactly.This option allows you to automate that process. When selected, the Top Elev and Bottom Elev options are hidden.
- Input walls.
You can also edit wall veneer settings after input using the Properties pane. See the procedure below.
 Notes:
- Planes, overhangs and cantilever lines are always attached to the wall. They are never attached to the veneer.
-
The corners of the veneer lap like walls (they are not mitered).
To add veneer to an existing wall:
- Select a wall that does not have a veneer.
The selected wall is highlighted and its properties display on the Properties grid.
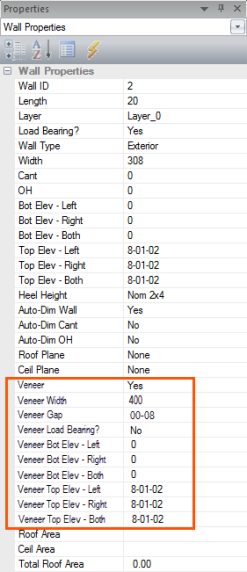
- Select Yes for the Veneer property.
Yes is displayed for the Veneer property in the Properties grid and a veneer is added to the wall. Additional veneer properties are displayed in the Properties Grid when Yes is selected. The default value for these properties are based on the EnvData settings.
Notes
When a veneer is added to a wall, the wall location does not move to accommodate the veneer; the veneer is simply added to the outside of the wall.
If two adjacent walls have veneers on them, the veneers will lap correctly at the corners. If the adjacent walls do not have a veneer, the wall veneer will end at the ends of the wall.
If a wall with a veneer is trimmed, the veneer will also be trimmed to the same length as the wall.
Remove veneers by selecting a wall with a veneer and changing the Veneer property to No.
Editing veneers
- Select a wall with a veneer.
The selected wall is highlighted and its properties display in the Properties grid. See the procedure above.
- Edit the veneer properties.
Notes
If a wall was originally created with a veneer, and the Wall option was selected for the Defining Edge, editing the veneer width or gap distance will not change the location of the wall. The gap distance and wall veneer width will be changed only on the outside of the wall.
If a wall was originally created with a veneer, and the Veneer option was selected for the Defining Edge, editing the veneer width or gap distance will not change the location of the outside of the veneer. In this case, the outside of the veneer will not move, but the walls will based on the change to the veneer width and gap distance.
If a wall was originally created with a veneer, and the Wall option was selected for the Defining Edge, removing the veneer will not change the location of the wall. The wall will remain in the same location and the veneer will be removed.
If a wall was originally created with a veneer, and the Veneer option was selected for the Defining Edge removing the veneer will change the location of the wall. The wall will move so that the outside of it is located at the same location as the outside of the veneer before it was removed.
Trim wall or veneer
1. Double-click on a line (wall edge, reference line, truss edge, etc.)
A dashed red line displays.
2. Select the wall or veneer to trim
The wall and veneer are highlighted.
- From the Walls menu, select either Trim Wall or Trim Veneer. Alternatively, you can select Trim from the General menu.
- If Trim Wall was selected, only the wall is trimmed
- If Trim Veneer is selected only the veneer is trimmed
- If Trim is selected both the wall and the veneer are trimmed
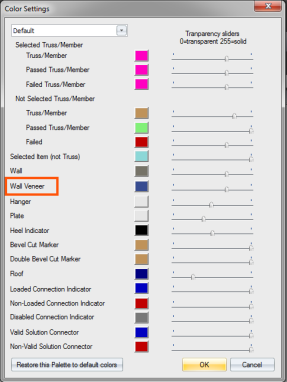
You can also define the wall veneer color in Color Settings.